FIRING TECHNIQUES—RIFLE
The most important factors for you to remember
about firing a rifle are sight alignment and achieving a
correct aiming point. Together they make up the sight
picture.
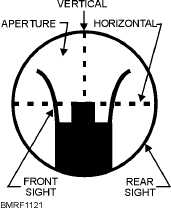
Sight Alignment
Sight alignment involves looking through the rear
sight aperture, focusing the eye on the front sight post
(or blade), and centering the front sight post exactly in
the rear sight aperture, both vertically and horizontally.
The top of the front sight is level with the horizontal
center line of the rear sight, and the body of the front
sight is centered between the rear sight aperture
(fig. 11-21).
REAR SIGHT.—When you are in different firing
positions (standing, kneeling, or sitting), your aiming
eye is at a slightly different distance from the rear sight.
This distance is referred to as eye relief. Eye relief
makes the opening (peep) of the rear sight appear larger
or smaller, depending on the firing position. Regardless
of the apparent size of the rear sight opening, you
must align the front sight in the center of the
opening.
It is important to keep your eye the same distance
from the peep sight in any particular firing position. To
ensure this distance is always the same, you must hold
the rifle in the same exact location for each shot. This
location is commonly called the spot weld or anchor.
There are several tricks shooters use to help maintain
this distance. For example, you can place a small piece
of tape on the stock of the rifle where it touches the
cheek. In this way, you can feel whether your cheek has
the proper eye relief.
FRONT SIGHT.—The front sight always appears
to be the same size. However, depending on the distance
your eye is from the rear sight, more or less of the front
sight may be visible in the sight picture. The front sight,
not the target, is the point of focus for the eye. As such,
the front sight will be sharp and distinct in outline. For
this reason, keep the front sight square, level, and
blackened.
AIMING POINT.—The aiming point is the point
on the target where the sights of the weapon are brought
to bear. The correct aiming point is at 6 o’clock; that is,
the bottom of the bull’s-eye of a type “A” target (fig.
11-22) or the silhouette of a type “D” target (fig. 11-23).
Any location on the target face is always given relative
to a similar position on a clock face regardless of the
target shape. Therefore, a vertical line in the exact center
of the target would be described as running from 12
o’clock (top) to 6 o’clock (bottom).
SIGHT PICTURE.—To obtain the correct sight
picture, you need to align the rear sight, the front
sight, and the bull’s-eye (figs. 11-22 and 11-23). Each
of these three elements affects the sight picture. As
you can see from figure 11-24, any error in sight
alignment will increase as the range increases. An
error in the aiming point remains constant as the
range increases.
At close ranges, the bull’s-eye or silhouette appears
larger in relation to the front sight than it will at longer
11-16
Student Notes:
Figure 11-21.—Proper sight alignment.
Figure 11-22.—6 o’clock sight picture held on “A” target
at a range of 200 yards.