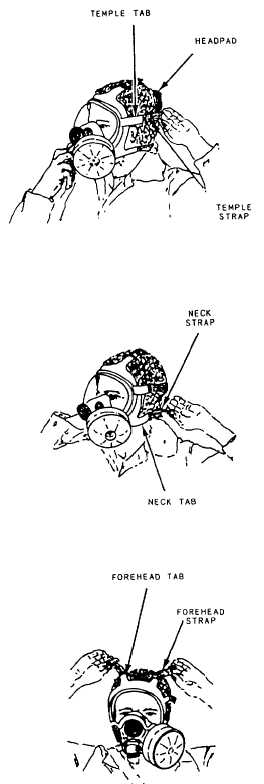
Figure 6-7.-Adjusting straps.
8.
9.
10.
11.
12.
Tighten one temple strap (fig. 6-7) until
the mask feels snug on that side. Tighten
the other temple strap until both sides feel
the same. (Tighten all straps toward the
rear of the head with small jerks vice a
long pull.)
Run a finger under each temple tab front-
to-back to check for snugness and to
remove stray hair from sealing area.
Grasp a neck strap in each hand and
tighten.
Grasp a forehead strap in each hand and
tighten.
Shake head quickly from side to side and
up and down. Retighten mask straps as
necessary.
NOTE: In subsequent donnings, only the neck
straps should need adjusting.
LEAK CHECK AND REMOVAL. —You
must check the mask for leaks when it is fitted
and each time you put it on. A leaky mask will
not protect you from toxic agents that can cause
sickness or death.
WARNING
Do not hold a mask by its canister. An
unscrewed canister is the most common
cause of leaks.
Use the following procedures to test for leaks
1.
2.
3.
4.
5.
6.
Steady the mask and pull the external end
of the drinking tube (a quick-disconnect
coupling) out of the outlet valve cover.
Grasp the outlet valve assembly with the
thumb at the bottom and the forefinger at
the top. Push the forefinger toward the
mouth to get the internal end of the
drinking tube between the teeth.
Test the drinking tube for leaks by
blowing into the tube. If resistance is not
felt, the drinking tube is leaking; repair or
get a replacement.
Push the coupling firmly back into its
socket.
Make sure the canister is screwed in tight.
Press the palm of the hand over the end
of the canister. Breathe in until the lens
collapses, Hold your breath for 10 seconds.
If the lens remains collapsed, the mask is
6-15