KNOTS, BENDS, AND HITCHES
Except among seamen, the word knot is ordinarily
used as an all-inclusive term, covering the more specific
use of knots plus bends and hitches. Even seamen find it
hard to clearly define the terms knot, bend, and hitch
because their functions overlap like the bowline knot
and many other instances. In general, however, the
terms may be defined as follows:
Knots. Knots are used to form eyes or to secure a cord or
line around an object, such as a package. In other
words, the line is bent to itself.
Hitches. Hitches are used to bend a line to or around an
object, such as a ring, spar, or stanchion.
Bends. Bends are used to secure two lines together.
All Navy personnel should know the square knot,
bowline, single- and double-becket bends, round turn
and two half hitches, and clove hitch. Navy personnel
should know when these knots, bends, and hitches are
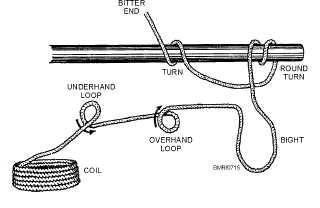
used. Before reading further, look at figure 7-15, which
shows a few terms that make it easier for you to
understand the following procedures.
Square Knot
The square knot, also known as the reef knot from
its use in reefing sails, is quickly and easily made and
has a great many uses. It will not slip, but it can jam
under heavy strain. It can be loosened, however, by
pulling on first one and then the other end. Figure 7-16
shows steps in making a square knot.
Bowline
The bowline, with its many variations, has a lot of
uses. Its chief use is to form an eye; but it can also be used
to secure a line to a pad eye, to secure another ring around
a stanchion or other object, or to bend two lines together.
To tie a bowline, you should—
1. Grasp the bitter end of the line in the right hand
and the standing part in the left hand (opposite,
if left-handed). Assuming you are using small
stuff, the length of line between your hands
should be about 2 feet.
2. Throw an overhand loop counterclockwise near
your left hand (clockwise near your right hand,
if you are left-handed).
3. Grasp the loop formed and hold it. Pass the bitter
end up through the bottom of the loop, as shown
in figure 7-17, view A.
4. Pull the bitter end up through the loop, and pass
it around behind the standing part of the line
(fig. 7-17, view B).
5. Pass the bitter end down through the loop beside
the line that was pulled up through the loop
(fig. 7-17, view C).
6. To tighten the knot, grasp the standing part in
one hand and the two lines passed through the
loop with the other hand, and pull.
7-11
Student Notes:
Figure 7-16.—Square knot.
Figure 7-15.—Elements of knots, bends, and hitches.


